
Why use DNS-Over-HTTPS?
DNS-Over-HTTPS is a protocol for performing DNS lookups via the same protocol you use to browse the web securely: HTTPS.
With standard DNS, requests are sent in plain-text, with no method to detect tampering or misbehaviour. This means that not only can a malicous actor look at all the DNS requests you are making (and therefore what websites you are visiting), they can also tamper with the response and redirect your device to resources in their control (such as a fake login page for internet banking).
DNS-Over-HTTPS prevents this by using standard HTTPS requests to retrieve DNS information. This means that the connection from the device to the DNS server is secure and can not easily be snooped, monitored, tampered with or blocked. It is worth noting however, that the upstream DNS-Over-HTTPS provider will still have this ability.
Configuring DNS-Over-HTTPS
Along with releasing their DNS service 1.1.1.1, Cloudflare implemented DNS-Over-HTTPS proxy functionality in to one of their tools: cloudflared.
In the following sections we will be covering how to install and configure this tool on Pi-hole.
Installing cloudflared
The installation is fairly straightforward, however be aware of what architecture you are installing on (amd64 or arm).
AMD64 architecture (most devices)
Download the installer package, then use apt-get to install the package along with any dependencies. Proceed to run the binary with the -v flag to check it is all working.
wget https://bin.equinox.io/c/VdrWdbjqyF/cloudflared-stable-linux-amd64.deb
sudo apt-get install ./cloudflared-stable-linux-amd64.deb
cloudflared -v
ARM architecture (Raspberry Pi)
Here we are downloading the precompiled binary and copying it to the /usr/local/bin/ directory to allow execution by the cloudflared user. Proceed to run the binary with the -v flag to check it is all working.
wget https://bin.equinox.io/c/VdrWdbjqyF/cloudflared-stable-linux-arm.tgz
tar -xvzf cloudflared-stable-linux-arm.tgz
cp ./cloudflared /usr/local/bin
chmod +x /usr/local/bin/cloudflared
cloudflared -v
Configuring cloudflared to run on startup
Create a cloudflared user to run the daemon.
sudo useradd -s /usr/sbin/nologin -r -M cloudflared
Proceed to create a configuration file for cloudflared by copying the following in to /etc/default/cloudflared. This file contains the command-line options that get passed to cloudflared on startup.
# Commandline args for cloudflared
CLOUDFLARED_OPTS=--port 5053 --upstream https://1.1.1.1/dns-query --upstream https://1.0.0.1/dns-query
Update the permissions for the configuration file and cloudflared binary to allow access for the cloudflared user
sudo chown cloudflared:cloudflared /etc/default/cloudflared
sudo chown cloudflared:cloudflared /usr/local/bin/cloudflared
Then create the systemd script by copying the following in to /lib/systemd/system/cloudflared.service. This will control the running of the service and allow it to run on startup.
[Unit]
Description=cloudflared DNS over HTTPS proxy
After=syslog.target network-online.target

[Service]
Type=simple
User=cloudflared
EnvironmentFile=/etc/default/cloudflared
ExecStart=/usr/local/bin/cloudflared proxy-dns $CLOUDFLARED_OPTS
Restart=on-failure
RestartSec=10
KillMode=process

[Install]
WantedBy=multi-user.target
Enable the systemd service to run on startup, then start the service and check its status.
sudo systemctl enable cloudflared
sudo systemctl start cloudflared
sudo systemctl status cloudflared
Now test that it is working! Run the following dig command, a response should be returned similar to the one below
dig @127.0.0.1 -p 5053 google.com


; <<>> DiG 9.10.3-P4-Ubuntu <<>> @127.0.0.1 -p 5053 google.com
; (1 server found)
;; global options: +cmd
;; Got answer:
;; ->>HEADER<<- opcode: QUERY, status: NOERROR, id: 65181
;; flags: qr rd ra; QUERY: 1, ANSWER: 1, AUTHORITY: 0, ADDITIONAL: 1

;; OPT PSEUDOSECTION:
; EDNS: version: 0, flags:; udp: 1536
;; QUESTION SECTION:
;google.com.            IN  A

;; ANSWER SECTION:
google.com.     299 IN  A   243.65.127.221

;; Query time: 3 msec
;; SERVER: 127.0.0.1#5053(127.0.0.1)
;; MSG SIZE  rcvd: 65
Configuring Pi-hole
Finally, configure Pi-hole to use the local cloudflared service as the upstream DNS server:
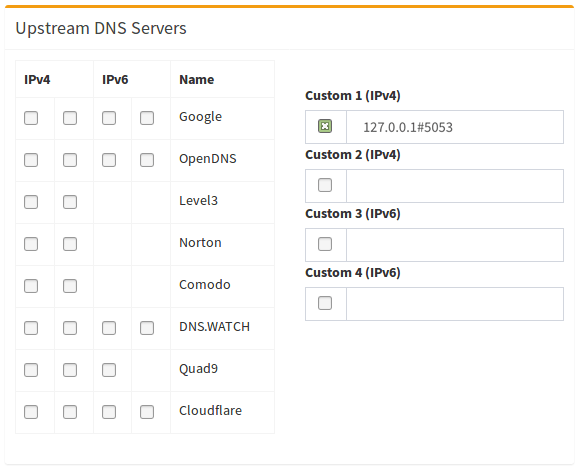
(don’t forget to hit Return or click on Save)